Open Toed Foot
Congratulations on making it this far! We only have one lesson remaining: mastering the art of the open-toed foot technique. This is a crucial step in your appliqué project journey, and it will make sewing along those edges a positive experience.
During the initial phase of my own appliqué journey, I often found myself trying to divert attention away from my stitching, especially the corners, as they were less than perfect, in fact they were messy. However, my appliqué sewing skill underwent a dramatic transformation when I encountered the fantastic tool known as the open-toed foot. The improvement was nothing short of fabulous for my appliqué sewing skills.
Modern sewing machines are usually equipped with an impressive assortment of presser feet, each tailor-made for specific operations. Take a look at your existing sewing accessories, and you might be pleasantly surprised to find the open-toed foot hiding along with others.
If, however, your current sewing machine does not come with an open-toed foot, purchasing one should be on your list. Investing in this tool can save you a lot of time, frustration, and the unwelcome exercise of unpicking not-so-perfect stitches.

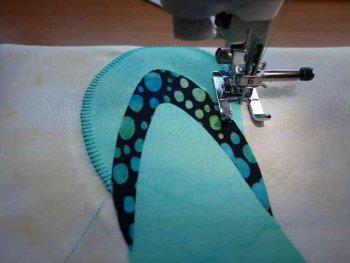
As shown in the picture above, one of the standout features of the open-toed foot is its allowance for clear visibility during stitching. This is particularly beneficial when using satin and other decorative stitches on your machine. The visual sewing area offered by an open-toed foot is much broader than the standard presser foot and the lack of a bar across the front ensures uninterrupted visibility.
The open-toed foot is especially useful for satin stitch appliqué or ornamental stitching. The manufacturing material for the foot varies across companies, with the most common options being metal or plastic.
While appreciating the appliqué skills at a quilt exhibition, observe the minutiae in stitching on display, especially around corners. You may notice that the stitching sizes decrease gradually as they approach the corner, or that some stitches are angled near the corner. Regardless of the method used, one can't place enough importance of having good visibility in sewing these techniques flawlessly. Practice indeed makes one perfect, and with a little patience, these techniques are quick to master!
Start practicing with your open-toed foot. You will soon realize how this tool allows you to produce professional-like stitches with ease, offering a wide variation in decorative stitch size based on the fabric and project specifics. Also, remember to starch your fabric ahead of time for a smoother, flatter surface to work on when using the foot.
Well done! You are now prepared to start on your own appliqué project. As a recap of these instructions, you may refer back to our appliqué tips and techniques. Rest assured, with the right tools and proper technique, you're bound to create appliqué work that you'll be very proud of.
My Amazon ads are my affiliate links. Thank you.
Sign up for my newsletter below!
Love Quilts?
Come be social with me - click here!


Sign up for my newsletter below!

How there's so much free information on this site.
Sometimes I recommend a product(s) that I have used & loved when making my quilts etc. If you buy something through one of these links, I receive a small commission which allows me to design & make more quilts! There is no extra charge to you, and it helps keep my information/patterns free of charge. To learn more please see my affiliate disclosure document.
Recent Articles
-
Perth Quilt Tour 2019
Nov 08, 18 04:17 PM
May 19 to May 28 2019 – Time for a getaway Join the fully escorted tour and take in the sights and tastes of the Margaret River Valley, visit the Perth Craft & Quilt Show and plenty of other exciting…
-
Pattern available for the Conical Felt Tree!
Oct 13, 18 11:21 PM
The Conical Felt Tree pattern is now available. This is a fabulous Christmas tree to make for young children. They will decorate this tree over and over again! Suppliers of the thick felt & Velcro fab…
-
Conical Felt Christmas Tree
Oct 11, 18 09:00 PM
Cassie is having fun decorating her Christmas tree! The pattern will be available at the end of October 2018.