- Home
- Trees
Felt Trees
Making felt trees for your children or grandchildren to enjoy at Christmas time or in fact at any time of the year is a great idea. Children of all ages including the very young love to decorate their own tree!
After making several different felt Christmas trees I have learnt some great tips in making them that I'd love to share with you.
Tips when making Felt Trees
1: Types of Felt for a 3D Tree
These felt trees are typically made out of 2 layers of felt. A base felt that is the support for the tree and a top layer of felt as the decoration layer.
Felt Base layer
I recommend 5mm thick felt as this felt is sturdy and hard wearing.
In the past I've used 3mm thick felt and while the tree is still standing after 4 years of use it is showing weak areas where the felt is collapsing so it has not stood up as well as I would have liked.
(I have to admit that I bought this felt thinking it was 4mm thick but I never checked it when it arrived. I was surprised at the thickness of the 5mm thick felt I bought recently when it arrived, so promptly checked it and also checked the other felt I had bought for my first tree 4 years ago - only 3mm! My fault entirely!!)
Felt Decorative Layer
Here you can use any regular thickness of felt you want, be it...
...wool
...wool blend
...polyester etc
You will need a fairly large piece of felt or pieces of felt to cover the base layer. Sometimes this is not always easy to source as a large single piece so you will need to work with what you can find.
I have used soft and hard polyester felt for this in the past and if I'm totally honest I didn't like either of them, especially the soft version because it was poor quality and became pilled by the velcro tape that I used to secure the tree into a cone shape. I now use velcro fabric.
2: Sewing Machine Needle Size
You will need several different sizes of needles for your sewing machine to sew all the different materials when making felt trees. I used Sewing Parts Online to help me here.
- Use a sewing machine needle size either 100/16 or 110/18 to sew the thick felt & decorative felt layers together
- Use a sewing machine Jeans needle to sew your velcro dots onto the thick & decorative felt.
- Use a sewing machine needle 90/14 to sew velcro dots onto thin felt eg when making your decorations
3: Scissors
You probably already have scissors that will cut your felt perfectly but they need to be sharpened.
I use a large pair of dress making scissors to cut the thick felt and these work well
For cutting small fiddly pieces of felt I recommend using a fine tipped super sharp pair that cuts right to the tip. I use a Fiskars Micro Tip Fashion Scissors 5".
4: Cutting Felt Accurately from a Pattern
Now there is a real art to cutting out your felt pieces accurately and it is a lot simpler than you realise. Please DON"T USE PINS!!! They make it almost impossible to cut accurately. Instead...
Method 1: Transfer you patterns onto freezer paper and iron this onto your felt then cut out
or...
Method 2: Using scotch tape - tape you pattern pieces to the felt all around the edges then cut out - your pattern pieces will be reinforced with this method and able to be reused time and time again
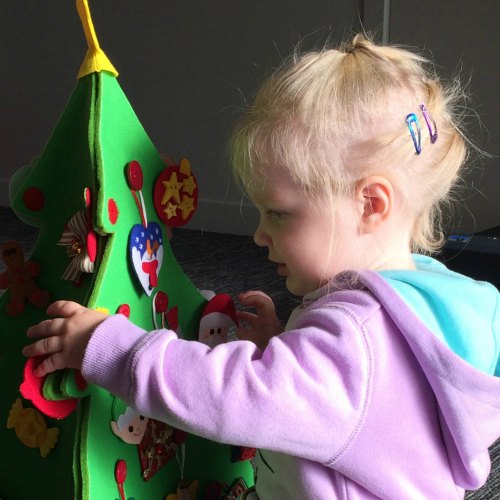
5: Making Felt Decorations
You will be using the traditional thin felts here for this job and choosing which ever felt appeals to you. I've used every type imaginable including patterned, glitter, natural fibres and man made. They all have their pros and cons. If you have a strong preference for one over the other then you already have made the right decision for yourself.
I like to sew my decorations on my sewing machine and I find the hard polyester felts work best here. The beautiful wool felts work best with hand stitching.
Which ever you choose you may find that you need to add some interfacing to add body & durability to your works of art. Here's a wee story...
My granddaughter Bella invited me to play with her and that's an offer that's just too hard to refuse...
As she led me off to her room my daughter warned me to not be alarmed...lol...
I had no idea what she was referring to...
but I soon found out...
Bella had me sit at her wee table...
She then got all the felt decorations and Busy Book felt toys I'd made out on her bed and placed them in her salad spinner... and round & round they went...
Lunchtime...
Wow she was having so much fun creating her own games with all the wee felt toys, it was a delight to see...
Mental note to self - make all future felt decorations strong!!! Also check out how the different felts were going to wear with all this play over time.
The good quality felts whether wool or polyester have both stood up to this play extremely well. The only ones that have suffered were the poor quality ones.
If you'd like some guidance then here is my recommendation and what I now use.
Hard polyester felt. It washes, maintains it shape, comes in a great range of vibrant colours and sews like a dream on my sewing machine.
6: How will you Attach Your Decorations to the Tree
There are several great methods to use to attach your decorations to your tree. Here are my suggestions:
- velcro
- ribbon loops & buttons
- hooks and paper clips
Each one requires a different level of skill so you need to think about who will be playing with your tree and decide which one or combination of ones will work best for you.

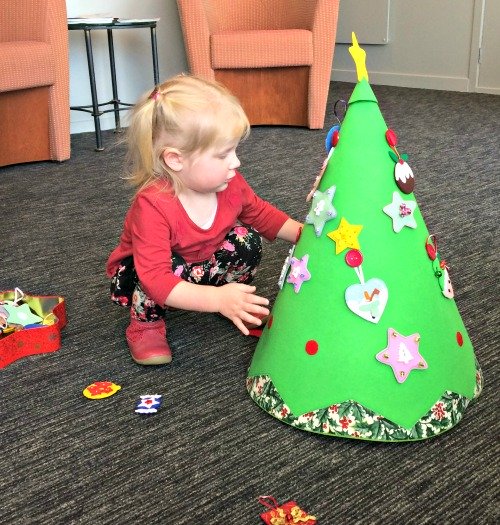
Aleisha in 2018 with the demo felt Christmas tree I made and all the decorations she has made!
We both had a lot of fun making these decorations - I supplied some of the patterns while she put them together.
My Amazon ads are my affiliate links. Thank you.
- Home
- Trees
Sign up for my newsletter below!
Love Quilts?
Come be social with me - click here!


Sign up for my newsletter below!

How there's so much free information on this site.
Sometimes I recommend a product(s) that I have used & loved when making my quilts etc. If you buy something through one of these links, I receive a small commission which allows me to design & make more quilts! There is no extra charge to you, and it helps keep my information/patterns free of charge. To learn more please see my affiliate disclosure document.
Recent Articles
-
Perth Quilt Tour 2019
Nov 08, 18 04:17 PM
May 19 to May 28 2019 – Time for a getaway Join the fully escorted tour and take in the sights and tastes of the Margaret River Valley, visit the Perth Craft & Quilt Show and plenty of other exciting…
-
Pattern available for the Conical Felt Tree!
Oct 13, 18 11:21 PM
The Conical Felt Tree pattern is now available. This is a fabulous Christmas tree to make for young children. They will decorate this tree over and over again! Suppliers of the thick felt & Velcro fab…
-
Conical Felt Christmas Tree
Oct 11, 18 09:00 PM
Cassie is having fun decorating her Christmas tree! The pattern will be available at the end of October 2018.