Paper Piecing Instructions
These paper piecing instructions are for you to learn this technique so that the world of more intricate and beautiful blocks are open to you! Especially the blocks that are small or require sharp points with difficult angles that you know would be too difficult to achieve with regular piecing.
When I first tried this technique some years ago I was a bit intimidated due to all the bad publicity out there. Also the requirement of sewing upside down felt not only weird but wrong. I also dived in trialling it on a more complicated block - not a good idea. Consequently I didn't try this technique again for some time.
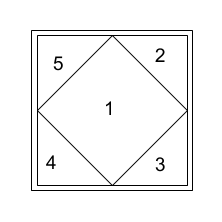
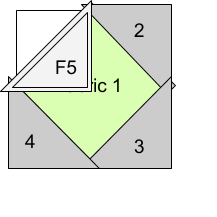
Below is a simple paper piecing block for you to download and practice paper piecing on. You will need just a small amount of fabric to make up this block.
So let's get started first with some ...
Paper Piecing Tips
- Pre-starch you fabrics - optional
- Ensure you cut fabrics bigger than you think you need
- Shorten your machines stitch length to 1.5 (15 - 18 stitches/inch) as this improves perforation of the paper, making it easier to remove at the end
- Needle size 90/14 also helps paper perforation & removal at the end. You can also use 80/12 but I wouldn't go any smaller than this
- Use an open toed foot so you can easily see that your needle is sewing along the printed line
Paper Piecing Instructions
Set sewing machine stitch to 1.5
Needle size 90/14
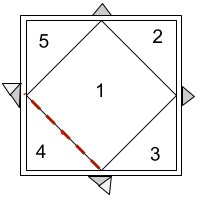
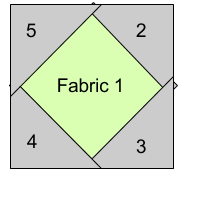
Finished Block Size 4½" x 4½"
Print out a copy of the block. The side with the markings on it is the BACK or WRONG side or your block. Trim.
First cut a piece of fabric large enough to cover the center square "1" with ½" extra on all sides. Place over square on the unprinted side of paper, flip over ad hold up to the light to check placement is over square "1" plus ½" beyond all sides. Pin...

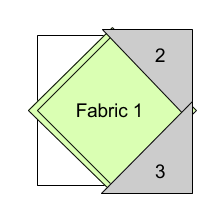
Now cut a piece of fabric large enough to cover "2" plus ½" extra on all sides. Place this right sides together with fabric "1". Hold up to the light to check placement is over "2" plus ½" beyond all sides. Hold together and...

Flip the whole thing over and stitch on the line between section 1 & section 2. Do a short backstitch at the beginning and end of this row of stitching. Fold paper piece "2" back on itself and trim the seam allowance back to just ¼". Now flip it all back over...
Carefully press open the "2" piece, using a dry iron...

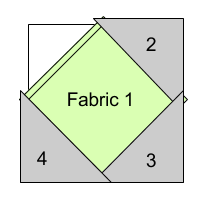
Next cut a piece of fabric large enough to cover "3" plus ½" extra on all sides. Place this right side together with fabric "1". Hold up to the light to check placement before sewing. Hold everything together and flip it back over...
Stitch on the line between section 1 & section 3. Again do a short backstitch at the beginning and end of this row of stitching. Fold paper piece "3" back on itself and trim the seam allowance back to just ¼". Now flip it all back over...
Carefully press open the "3" piece, using a dry iron...
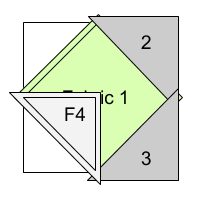
Next cut a piece of fabric large enough to cover "4" plus ½" extra on all sides. Place this right side together with fabric "1". Hold up to the light to check placement before sewing. Hold everything together and flip it back over...
Stitch on the line between section 1 & 4. Again do a short backstitch at the beginning and end of this row of stitching. Fold paper piece "4" back on itself and trim the seam allowance back to just ¼". Now flip it all back over again...
Carefully press open the "4" piece, using a dry iron...
Lastly cut a piece of fabric large enough to cover "5" plus ½" extra on all sides. Place this right side together with fabric "1". Hold up to the light to check placement before sewing. Hold everything together and flip it back over...

Stitch on the line between section 1 & 5. Again do a short backstitch at the beginning and end of this row of stitching. Fold paper piece "5" back on itself and trim the seam allowance back to just ¼". Now flip it all back over again for the last time...
Carefully press open the "5" piece, using a dry iron...and...you ...have...
FINISHED!!!
If you've read this far then you are probably wondering why I recommend in these paper piecing instructions to cut your fabric pieces 1/2" larger on all sides than usually required. Well...
...hopefully by doing this and getting into the habit of using larger pieces you will avoid the dreaded unpicking (remember you are using a shorter stitch) due to your fabric not covering the required space. I've done this more times than I'd like to remember and it's super frustrating.
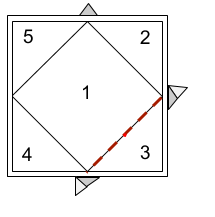
One last piece of advice - if you are making a quilt with paper piecing blocks being sewn together it is super important to take care with the final trimming of the outer edge of the blocks, as the raw edges of all the joining blocks must match - or you will have a frustrating mess! So trim the outer edges accurately. And yes you remove the paper after all the blocks have been sewn together.
Sign up for my newsletter below!
Like the page? Let me know! (click the button).
Love Quilts?
Come be social with me - click here!


Sign up for my newsletter below!

How there's so much free information on this site.
Sometimes I recommend a product(s) that I have used & loved when making my quilts etc. If you buy something through one of these links, I receive a small commission which allows me to design & make more quilts! There is no extra charge to you, and it helps keep my information/patterns free of charge. To learn more please see my affiliate disclosure document.
Recent Articles
-
Perth Quilt Tour 2019
Nov 08, 18 04:17 PM
May 19 to May 28 2019 – Time for a getaway Join the fully escorted tour and take in the sights and tastes of the Margaret River Valley, visit the Perth Craft & Quilt Show and plenty of other exciting…
-
Pattern available for the Conical Felt Tree!
Oct 13, 18 11:21 PM
The Conical Felt Tree pattern is now available. This is a fabulous Christmas tree to make for young children. They will decorate this tree over and over again! Suppliers of the thick felt & Velcro fab…
-
Conical Felt Christmas Tree
Oct 11, 18 09:00 PM
Cassie is having fun decorating her Christmas tree! The pattern will be available at the end of October 2018.
New! Comments
Have your say about what you just read! Leave me a comment in the box below.