- Home
- Rag Quilts
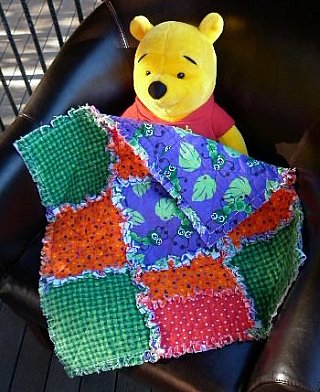
- Small Rag Quilt
Small Rag Quilt Pattern
Dolls Blanket or Security Blanket
When selecting your fabrics to make this small rag quilt it is advisable to buy the best quality fabric you can afford.
You will notice that the cheaper fabrics are woven more loosely. As this is a raw edged quilt there is quite a bit of lint and thread that comes away on the first washing and the better the fabric quality the less lint.
There is no need to prewash the fabrics unless you are checking for color bleeding. It is more common to have this problem with red fabrics.
|
To make this small rag quilt on the right you will need a selection of flannel fabric. I used 4 different types for the top and one for the backing.
sixteen - 9" squares of flannel (9 for the back & 7 for the front)
four - 9" x 5 1/2" rectangles of flannel
nine - 7" squares of batting
Thread |
 |
Step 1:
Cut five 9" x 9" flannel squares for the top of your quilt
Cut eight9" x 5 1/2" flannel rectangles for the top of your quilt
Step 2:
Cut nine 9" x 9" flannel squares for the back of your quilt
Step 3:
Cut nine 7" x 7" squares from your batting
Step 4:
Sew pairs of rectangles together with fabric wrong side to wrong side, using a 1" seam
Arrange squares into desired pattern
Step 5:
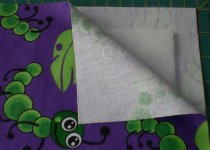
It is now time to place batting between the flannel layers. If your backing fabric has a one way design check that the design is facing the right way up. Now, place one backing square (wrong side up), position a batting square centrally and another top square (right side up) on top, making a fabric sandwich.
Step 6:
Sew each square on the diagonal through all three layers from batting corner to batting corner. You can see this on my quilt above and below. Repeat this step till all the pieces are completed. You should have 9 sandwiches ready to sew together.
Step 7:
Now comes the exciting part - joining the squares into rows
First - lay out your squares into the desired pattern
Next - begin with the top row and sew each square to the one next to it. Remember to have all raw edges facing towards the front!!!
Step 8:
Join the rows together. Again Remember to have all raw edges facing towards the front!!!
Step 9:
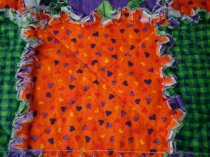
Sew a 1" triple seam around the entire quilt.
Well done!! Your small rag quilt is nearly finished!!
Step 10:
Clip each raw edge at 1/2" (1 1/2cm) intervals and up to an 1/8" from the seam.
Step 11:
You are now ready to machine wash your quilt and then dry your quilt in the dryer using a hot setting. After washing and drying your quilt be prepared to clear out the lint and thread that gets left in your washer or dryer. I sometimes need to dry my quilt twice as the seams can take a little longer to dry.
When using a more loosely woven fabric you may need to tidy up the raw edges by pulling out any loose threads
Congratulations on completing your small rag quilt!!!
Tips & Techniques
* Sew a shape onto the center of the square in a contrasting fabric eg a heart, ball etc
* You can substitute batting with another layer of flannel fabric. If you choose to do this then cut all squares 9". This will make the cut edges very fluffy - this is what makes the quilts so unique!
* You can also make this quilt using denim
- Home
- Rag Quilts
- Small Rag Quilt
Sign up for my newsletter below!
Love Quilts?
Come be social with me - click here!


Sign up for my newsletter below!

How there's so much free information on this site.
Sometimes I recommend a product(s) that I have used & loved when making my quilts etc. If you buy something through one of these links, I receive a small commission which allows me to design & make more quilts! There is no extra charge to you, and it helps keep my information/patterns free of charge. To learn more please see my affiliate disclosure document.
Recent Articles
-
Perth Quilt Tour 2019
Nov 08, 18 04:17 PM
May 19 to May 28 2019 – Time for a getaway Join the fully escorted tour and take in the sights and tastes of the Margaret River Valley, visit the Perth Craft & Quilt Show and plenty of other exciting…
-
Pattern available for the Conical Felt Tree!
Oct 13, 18 11:21 PM
The Conical Felt Tree pattern is now available. This is a fabulous Christmas tree to make for young children. They will decorate this tree over and over again! Suppliers of the thick felt & Velcro fab…
-
Conical Felt Christmas Tree
Oct 11, 18 09:00 PM
Cassie is having fun decorating her Christmas tree! The pattern will be available at the end of October 2018.