My Patchwork Bag
Made in 2014
My patchwork bag was made using fabric from my stash and some of those fancy stitches built in to my sewing machine. I must admit to loving the complete process from fabric selection, to sewing on the magnetic closure at the end.
This was a class offered at my local quilting group in February 2014. The tutor mentioned that she had seen a similar bag years ago in a magazine and then designed her own version. I'd love to have been able to share the pattern with you but it's not my pattern to share. I'm sure you could be creative and use a similar technique and any bag pattern you have.
This bag is lined and I sewed in a side pocket on each side of the lining. There are only 4 pattern pieces: front/back, handle, base and leaf template.
To make this bag I purchased the following materials:
- Selection of 8 coordinating batik fabrics
- 60cm of fabric for bag back
- Bag batt - this is a stiff batting
- 70cm of fabric for bag lining
- Large magnetic closure
- Steam-a-seam or similar
- Dark matching thread
- Contrasting thread
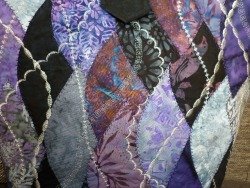
The template we used was similar to a leaf shape and was about the size of your hand. After fusing the steam-a-seam to the back of my batiks I cut out about 34 of these leaf shapes to use for the front and for the base. The key to placement of the shapes is to avoid creating horizontal lines. It may take a few tries before you get the hang of it. Begin on the left hand side and have fun.
When all the shapes had been positioned and ironed in place I used a dark matching thread and a Feather Stitch to sew around each shape - you can see this in the photo below.
At this point I played with a lot of the fancy stitches on a scrap of fabric from this project. It was amazing how different some of the stitches looked and it made the stitch selection process so easy!!
 |
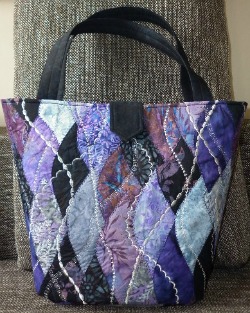
The photo to the left shows a close-up of the front of my patchwork bag. You can see I used a range of different fancy stitches with a contrasting thread. I sewed 3 curvy lines using the same stitch on each side. I think I used 4 different stitches on each side and on the base. |
|
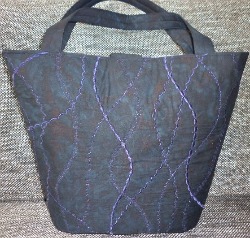
This photo shows the back where I decided to leave it plain (not appliqued) and decorate it with the same fancy stitches I had used on the front, in a curvy line format. |
 |
I used a triple stitch to sew the side seams of the bag together and as extra reinforcement I sewed each side seam open using the triple stitch again - this certainly gives the bag strength!!
The handles were made from bag batt as well.
Sign up for my newsletter below!
Love Quilts?
Come be social with me - click here!


Sign up for my newsletter below!

How there's so much free information on this site.
Sometimes I recommend a product(s) that I have used & loved when making my quilts etc. If you buy something through one of these links, I receive a small commission which allows me to design & make more quilts! There is no extra charge to you, and it helps keep my information/patterns free of charge. To learn more please see my affiliate disclosure document.
Recent Articles
-
Perth Quilt Tour 2019
Nov 08, 18 04:17 PM
May 19 to May 28 2019 – Time for a getaway Join the fully escorted tour and take in the sights and tastes of the Margaret River Valley, visit the Perth Craft & Quilt Show and plenty of other exciting…
-
Pattern available for the Conical Felt Tree!
Oct 13, 18 11:21 PM
The Conical Felt Tree pattern is now available. This is a fabulous Christmas tree to make for young children. They will decorate this tree over and over again! Suppliers of the thick felt & Velcro fab…
-
Conical Felt Christmas Tree
Oct 11, 18 09:00 PM
Cassie is having fun decorating her Christmas tree! The pattern will be available at the end of October 2018.