- Home
- 52 Week Challenge
- Week 23
Joannes Designs Week23
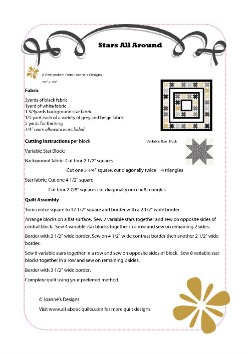
Stars All Around 70" x 70"
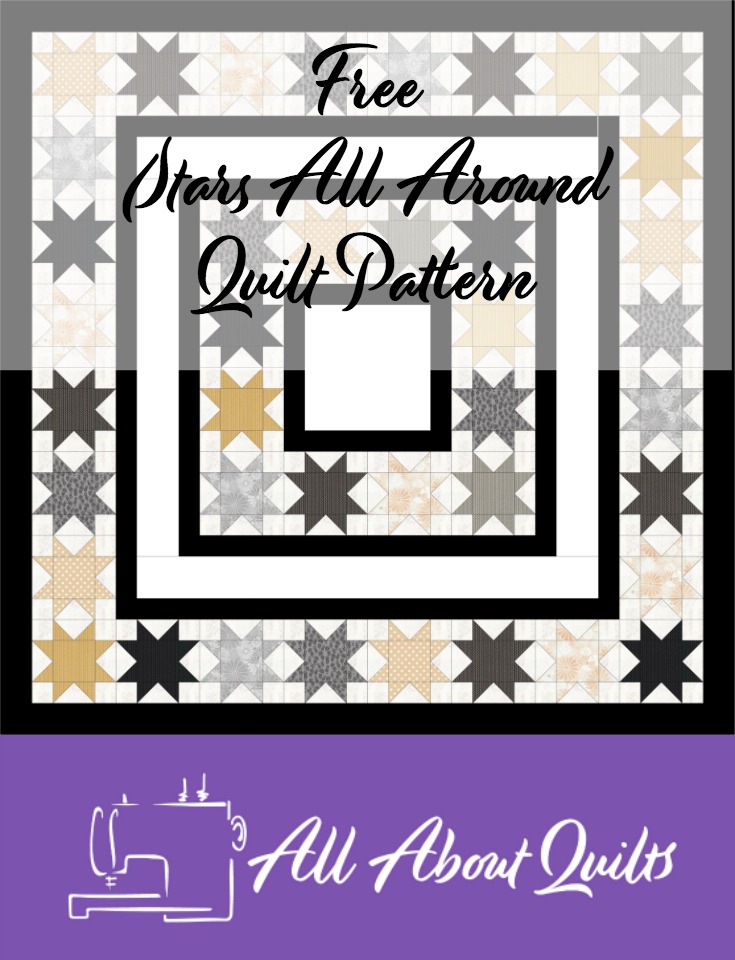
Joannes Designs Week23 'Stars All Around' a design I created using the variable star block. I am currently doing my first red-work stitching and have been experimenting with quilt designs that I can use them in.
This design is one that I saw at an exhibition some time ago and it keeps coming back to me. The quilter had done beautiful machine embroidery along the white borders in red and it looked stunning!
I have left the white border fabrics blank for you to use as you wish. If embroidery isn't your thing you may have a stunning piece of quilting fabric that would really look great as well.
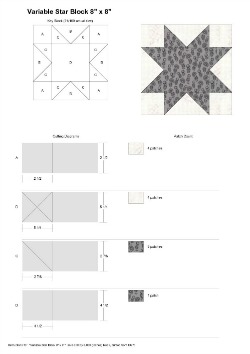
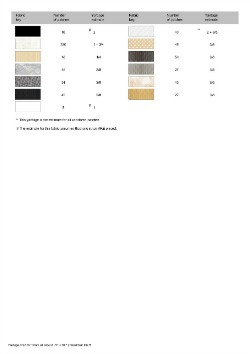
I have made the variable star block 8" x 8" square when finished. The fabric yardage guide for this quilt is only a guide so if you choose to use less or more fabrics than I have then 1/2 yard of each different star fabric is a good starting guide.
To make this quilt you will need to make 40 blocks. Each block is finished at 8" x 8" and is made using the rotary cutting guide below. The central starting block is a 12 1/2" square. Each inner border is cut either 2 1/2" wide or 4 1/2" wide, with the final outer border being cut 3 1/2" wide.
To download Joannes Designs Week23 'Stars All Around' pattern, rotary cutting block guide or fabric yardage guide click on the relevant image below.

My advice when making this quilt:
This quilt is designed for you to be able to display some of your embroidery or red-work in. If your centre piece is a different size remember you can play with the border widths to bring it up to the appropriate size.
When assembling this quilt it is very important to accurately measure before adding any borders whether they are pieced or plain. With all the handling of fabric while making a quilt top it is not uncommon for the length of each side to be slightly different from each other. If care is not taken then you will only exaggerate the differences - remember seeing a wavy edged quilt or one that wouldn't sit flat?
Here is the method I was taught at my quilting group to add borders accurately:
1. Measure the quilt from top to bottom through its vertical center point. Repeat twice more - once on the left and then the right of the center point. Add these lengths together, and then divide by 3 to obtain the average length. Cut the borders this length. I like to cut my borders on the straight of the grain as there is almost no stretch in the fabric and hence the borders lay flat. You can also cut them across the grain, but remember there will be a bit of stretch in the fabric.
2. Pin side borders on first beginning at the center point of both the quilt and border, right sides together (find the center point of both and finger press). Pin the top & bottom of the border to the quilt. Continue pinning the border to the quilt and ease in any fullness you may need to. The amount of pinning you need to do depends on whether you have much fullness to ease in. More fullness = more pins.
3. Sew using a 1/4" seam allowance, removing pins as you approach them. I have heard that it is best to sew with the fullest part of the quilt closest to the feed dogs.
4. Add the other side border using the same method.
5. Repeat the measuring process but horizontally. Sew top and bottom borders on.
Once I learnt this method I never had a wavy edged quilt again!
I hope you enjoyed Joannes Designs Week23. Just 29 patterns to go!
My Amazon ads are my affiliate links. Thank you.
- Home
- 52 Week Challenge
- Week 23
Sign up for my newsletter below!
Love Quilts?
Come be social with me - click here!


Sign up for my newsletter below!

How there's so much free information on this site.
Sometimes I recommend a product(s) that I have used & loved when making my quilts etc. If you buy something through one of these links, I receive a small commission which allows me to design & make more quilts! There is no extra charge to you, and it helps keep my information/patterns free of charge. To learn more please see my affiliate disclosure document.
Recent Articles
-
Perth Quilt Tour 2019
Nov 08, 18 04:17 PM
May 19 to May 28 2019 – Time for a getaway Join the fully escorted tour and take in the sights and tastes of the Margaret River Valley, visit the Perth Craft & Quilt Show and plenty of other exciting…
-
Pattern available for the Conical Felt Tree!
Oct 13, 18 11:21 PM
The Conical Felt Tree pattern is now available. This is a fabulous Christmas tree to make for young children. They will decorate this tree over and over again! Suppliers of the thick felt & Velcro fab…
-
Conical Felt Christmas Tree
Oct 11, 18 09:00 PM
Cassie is having fun decorating her Christmas tree! The pattern will be available at the end of October 2018.