DJ Reverse Applique
My DJ reverse applique technique that I show below is one that I learnt especially to make this quilt. It has become my preferred method of applique and where possible I chose this method over regular applique. Several quilting friends mentioned they also found this the case when making their blocks and told me before I started on this journey! It was this comment that helped me choose to do all the applique by hand rather than by machine (my preferred method).
As I was making my blocks I found I acquired several essential items along the way. These all made it much easier and the results I achieved much better.
- Small sharp pointed scissors
- Magnifying light
- Applique needles
- Glue
To get as sharp a point as possible I found watching Sharon Schamber's video 'Needle Turned Applique' invaluable. This is where I found out about the huge benefits of using glue.
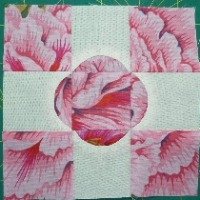
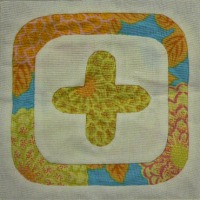
Below is block G13 that I made using this technique. I'm sorry for the photo quality, my current camera doesn't do closeups well.
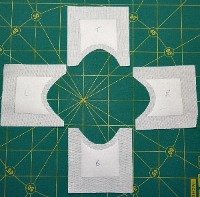 |
Iron freezer paper pattern onto right side of fabric. Cut along curved edge leaving a scant 1/4" seam allowance. Clip along the inside curve to within a few threads of freezer paper. |
 |
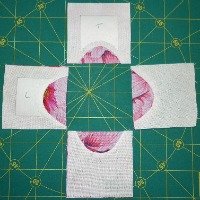
Place main fabric at the back right side up. Position plain fabric with freezer paper on top. Baste through all layers leaving room to turn seam allowance under. |
 |
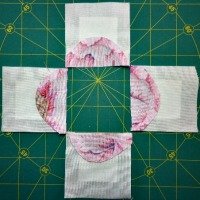
Turn seam allowance under and stitch using small stitches. |
 |
This photo shows the wrong side of the block after surplus fabric has been trimmed away. |
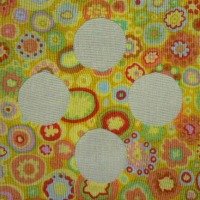
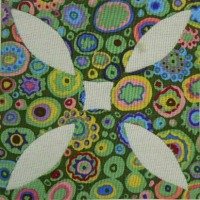
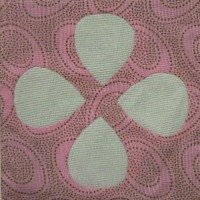
Below are some of the blocks within the quilt that use this technique. When making these blocks I referred to thatquiltblog as Anina has some very creative ways of interpreting the blocks that make it a lot easier to do. They are often more fabric hungry but the end results are so much better.
 |
 |
 |
 |
 |
Sign up for my newsletter below!
Love Quilts?
Come be social with me - click here!


Sign up for my newsletter below!

How there's so much free information on this site.
Sometimes I recommend a product(s) that I have used & loved when making my quilts etc. If you buy something through one of these links, I receive a small commission which allows me to design & make more quilts! There is no extra charge to you, and it helps keep my information/patterns free of charge. To learn more please see my affiliate disclosure document.
Recent Articles
-
Perth Quilt Tour 2019
Nov 08, 18 04:17 PM
May 19 to May 28 2019 – Time for a getaway Join the fully escorted tour and take in the sights and tastes of the Margaret River Valley, visit the Perth Craft & Quilt Show and plenty of other exciting…
-
Pattern available for the Conical Felt Tree!
Oct 13, 18 11:21 PM
The Conical Felt Tree pattern is now available. This is a fabulous Christmas tree to make for young children. They will decorate this tree over and over again! Suppliers of the thick felt & Velcro fab…
-
Conical Felt Christmas Tree
Oct 11, 18 09:00 PM
Cassie is having fun decorating her Christmas tree! The pattern will be available at the end of October 2018.