Log Cabin Instructions
The log cabin instructions are easy to follow. To begin making a log cabin block you need to first select two sets of coloured fabric, preferably one light and the other dark. You also need to decide whether your central square will be red or not.
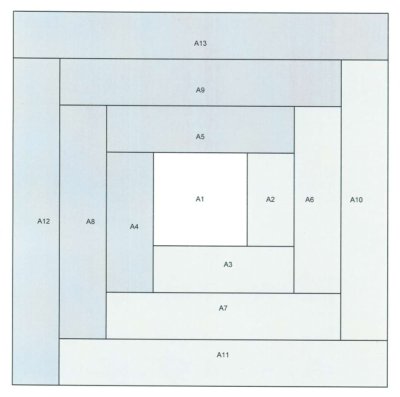
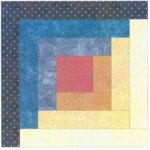
Below is a chart with your fabric strip requirements for an 8 1/2" completed block (8" when sewn into a quilt). As you can see I have chosen yellow and blue fabrics for these instructions.
Name |
Fabric Strips |
Fabric Color |
A1 |
2 1/2" x 2 1/2" |
Red |
A2 |
2 1/2" x 1 1/2" |
yellow |
A3 |
3 1/2" x 1 1/2" |
Yellow |
A4 |
3 1/2" x 1 1/2" |
Blue |
A5 |
4 1/2" x 1 1/2" |
Blue |
A6 |
4 1/2" x 1 1/2" |
Yellow |
A7 |
5 1/2" x 1 1/2" |
Yellow |
A8 |
5 1/2" x 1 1/2" |
Blue |
A9 |
6 1/2" x 1 1/2" |
Blue |
A10 |
6 1/2" x 1 1/2" |
Yellow |
A11 |
7 1/2" x 1 1/2" |
Yellow |
A12 |
7 1/2" x 1 1/2" |
Blue |
A13 |
8 1/2" x 1 1/2" |
Blue |
|
Begin with your central square 2 1/2" x 2 1/2" red block. Following the
diagram above sew each fabric strip on in order. It is best to press
after each seam is sewn. When all the strips have been added your block
should measure 8 1/2" square. Trim if needed. Well done, your first
block is completed! |
 |
Log Cabin Tips
If all that calculating above doesn't appeal to you then you can use Marti Michell's log cabin rulers. I have used her templates to make several quilts and they make life a lot easier. You do need to read her instructions on how to use them first! Or ask at your local quilting shop how to use them!
- Marti Michell has several log cabin rulers shown below. Using these takes the guessing and inaccuracy out of log cabins. There are several rulers and each has several different sizes of log cabins on them. I highly recommend buying one.
- Marti Michell has a superb log cabin book Log Cabin ABCs that offers a range of different log cabin patterns. You will be amazed at the variety and fun you will have when designing your log cabin quilt. The central square dimensions can match the widths of the strips. This has the effect of blending in the central square.
- The log cabin instructions above lend themselves to chain piecing , where you are making multiple blocks at the same time. This is a more efficient and fun way to work. Place the central square A1 right side UP at your sewing machine. As you sew lay the first strip A2 face down and sew them together. Continue sewing all the A1 and A2's together without cutting any threads. Next, cut them apart and press them, ready for adding the A3 strip of the round.

Sign up for my newsletter below!
Like the page? Let me know! (click the button).
Love Quilts?
Come be social with me - click here!


Sign up for my newsletter below!

How there's so much free information on this site.
Sometimes I recommend a product(s) that I have used & loved when making my quilts etc. If you buy something through one of these links, I receive a small commission which allows me to design & make more quilts! There is no extra charge to you, and it helps keep my information/patterns free of charge. To learn more please see my affiliate disclosure document.
Recent Articles
-
Perth Quilt Tour 2019
Nov 08, 18 04:17 PM
May 19 to May 28 2019 – Time for a getaway Join the fully escorted tour and take in the sights and tastes of the Margaret River Valley, visit the Perth Craft & Quilt Show and plenty of other exciting…
-
Pattern available for the Conical Felt Tree!
Oct 13, 18 11:21 PM
The Conical Felt Tree pattern is now available. This is a fabulous Christmas tree to make for young children. They will decorate this tree over and over again! Suppliers of the thick felt & Velcro fab…
-
Conical Felt Christmas Tree
Oct 11, 18 09:00 PM
Cassie is having fun decorating her Christmas tree! The pattern will be available at the end of October 2018.
New! Comments
Have your say about what you just read! Leave me a comment in the box below.