- Home
- Rag Quilts
- Flannel Quilt
Flannel Quilt
Free Pattern and Tutorial

Are you wanting to make a flannel quilt but are not sure where to start, then keep reading here. Using flannel in your quilts makes quilts that are super soft and great to snuggle under on a cold winters day due to their brushed surface.
You can use flannel to make a more traditional quilt where all the seam allowances are hidden away or you can use flannel to make one of those fabulous rag quilts where all the seam allowances are exposed - those are my favourite type of flannel quilts.
Which ever one you are going to make you will need to learn about the idiosyncrasies of sewing with flannel. I've made a lot of flannel rag quilts and I'm going to share a few tips I've learnt, to help you make a fabulous flannel quilt.
7 Tips For Sewing With Flannel
- Flannel frays - this happens because it is a loosely woven fabric so to counter this increase your seam allowance to 1/2"
- Flannel shrinks so if you are wanting to make a more traditional quilt then pre-wash your fabric using a hotter water temperature and dry using a hot cycle to maximise your shrinkage. If you choose to not pre-wash then when your quilt is finally washed (maybe years later) it will have a more vintage look or crinkly look. If you are after the vintage effect then don't pre-wash your fabric. It is this very shrinkage that makes the rag quilts so stunning, so if that is what you are going to make then don't pre-wash - I never do.
- Flannel stretches - again this is due to its looser weave and using a walking foot helps guide the fabric through more evenly
- Flannel has a brushed surface - this is what we love and are drawn to, I recommend lengthening your stitch length slightly because this will not only make it easier to unpick if you need to but also helps to reduce stretching
- Flannel can be hard on your sewing machine - use a new needle & try a different size 80/12 or 90/14
- Cut your flannel with a large rotary cutter or large scissors - this again helps reduce the risk of the flannel stretching
- Ironing flannel - take care here as this can stretch your flannel which is not ideal if you are wanting your plaid designed fabric to behave. It's best to press (place, hold & lift action) rather than iron by sliding the iron across the fabric
Now it's time to make a simple flannel quilt.
Making a Rag Flannel Quilt Tutorial

Materials Needed:
- 3 metres Main Fabric - paisley
- 2 metres Contrast Fabric - skulls
- Small amount of additional fabric - black
- Two 1 1/2 metres of Plain Fabric - pink & blue
Tools Needed:
- Sewing machine
- Large rotary cutter
- Cutting ruler & mat
- Hera pen
- Pattern
Step 1:
Cut out your fabrics into 9" x 9" squares. You will need the following:
25 paisley fabric (12 front/13 back)
21 skull fabric (9 front/12 back)
4 black (front)
25 plain fabrics (middle)
Step 2:
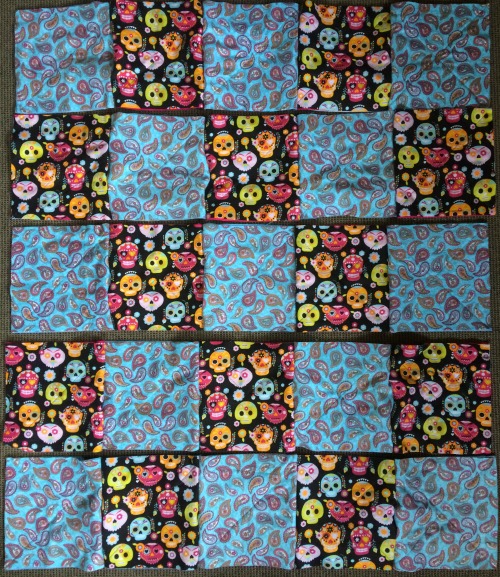
Now it's time to play with all those squares. This is best done on a flat surface like the floor. Below are my layouts.

Front Layout

Middle Layout

Back Layout
Step 3:
Place all the layers together in the correct order creating 25 block sandwiches.
- Place back fabric right side down
- Place middle fabric on top
- Place top fabric right side up (front)
Now quilt all 3 layers together by
- Using a hera pen & ruler to mark an X
- Sew along the indented X line using a slightly longer stitch

Block sandwich

First diagonal line marked using hera pen

X stitched through all layers using a longer stitch length
Step 4:
You are now ready to begin assembling all your blocks!
On a flat surface - I find the floor is best here - layout all your blocks in the correct order that you want them in. If you have used a directional fabric like my skull one then be sure to check the back of the quilt as well. This is a good time to check that you did actually stitch a X on every block.
When you are happy with your layout, pin the blocks together in rows.

Front layout with blocks pinned in rows
Back layout with blocks pinned in rows
Step 5:
Stitch your blocks together using your:
- walking foot
- a slightly longer stitch length
- a 1/2' seam allowance - I use my walking foot as my guide so my seam allowance is just under 1/2"
It is now that I like to begin clipping my seams. I use very sharp small scissors to clip my edges and it can be a long process if left to the very end ( I found I didn't like that), which you can choose to do if you prefer.
I clip about 1cm apart and try to begin my clips with the first one just under 1/2" from the edge.

Blocks stitched together in rows and edges clipped

Close up showing blocks sewn & clipped
Step 6:
Next it's time to sew all the rows together. There can be a bit of bulk at the seams so take care here. I open my seams up while matching the seams of both rows, then pin in place.

Rows sewn together

Close up showing seam allowances opened for sewing
Step 7:
One final seam to go!
Sewing around the outer edge is best done using a triple stitch if your machine has this. It is where the machine sews one stitch forward, one stitch back and then one stitch forward again. Do this using the same seam allowance that you did for the blocks and rows.
Lastly you just need to clip your seam allowances as before.
Step 8:
This is the fun part but also the messiest. Wash your flannel quilt and then dry it in the drier. This process causes the fabric to shrink and fray - creating those fabulous rag edges!
You may need to repeat the drying as the seams are thick and need extra time to dry fully.
You will notice that your finished flannel quilt needs a bit of a trim in places as well as a general tidy up. Start with giving it a really good shake outside then clip and pull away any loose threads.
All three photos below were taken after a good shake outside but before any trimming.


- Home
- Rag Quilts
- Flannel Quilt
Sign up for my newsletter below!
Like the page? Let me know! (click the button).
Love Quilts?
Come be social with me - click here!


Sign up for my newsletter below!

How there's so much free information on this site.
Sometimes I recommend a product(s) that I have used & loved when making my quilts etc. If you buy something through one of these links, I receive a small commission which allows me to design & make more quilts! There is no extra charge to you, and it helps keep my information/patterns free of charge. To learn more please see my affiliate disclosure document.
Recent Articles
-
Perth Quilt Tour 2019
Nov 08, 18 04:17 PM
May 19 to May 28 2019 – Time for a getaway Join the fully escorted tour and take in the sights and tastes of the Margaret River Valley, visit the Perth Craft & Quilt Show and plenty of other exciting…
-
Pattern available for the Conical Felt Tree!
Oct 13, 18 11:21 PM
The Conical Felt Tree pattern is now available. This is a fabulous Christmas tree to make for young children. They will decorate this tree over and over again! Suppliers of the thick felt & Velcro fab…
-
Conical Felt Christmas Tree
Oct 11, 18 09:00 PM
Cassie is having fun decorating her Christmas tree! The pattern will be available at the end of October 2018.
New! Comments
Have your say about what you just read! Leave me a comment in the box below.