Christmas Wreath Quilt
Made in 2011
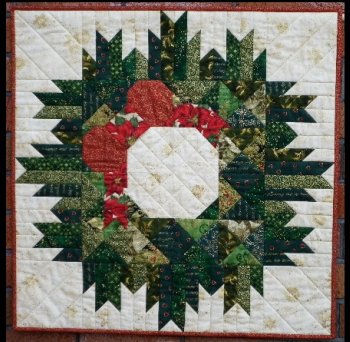
The Christmas Wreath quilt was a design that was published in Quiltmaker magazine from 2000. The instructions for making this wall quilt were given over 3 months and it was labeled 'Mystery Christmas Quilt'.
If you would like the pattern to this wee quilt then please contact me here or use the 'contact me' at the bottom of the page. I have requested permission to place the pattern on this page but never received a reply from Quiltmaker. So this is the best option for now.
One of our quilting group members organized the day for us to make this quilt and all we knew was that we would be making a mystery Christmas quilt. The pattern was organized in such a way that none of us knew what we were making until the end. It was a fabulous day and all the finished quilts looked quite different due to fabric choices.
Here are the instructions we were given to prepare for the day:
Use colors to suit your own Christmas quilt theme within your home.
White or cream multi-print for the background - 1 yard
Red Print 1 - 1/2 yard
Red Print 2 - 1/4 yard
Green Prints - 12 tone on tone prints from scraps
Backing & Sleeve - 1 yard
Batting - 30" x 30"
I have included my directions for adding a sleeve onto the back of this Christmas Wreath quilt once finished. A quilt sleeve is not difficult to add to your quilt. You can also watch a video of a quilt sleeve being attached.
Sleeve Instructions
1. Cut a strip of fabric 9" x the width of your quilt on the straight of the grain for extra strength
2. Neaten each end (the 9" long ends) by turning the ends over twice towards the wrong side of the fabric and sewing close to the folded edge. This helps the rod slide in easily and stop any messy threads from appearing.
3. With wrong sides together fold sleeve in half lengthwise and press lightly. This press line will act as a guide for the two folds in number 4.
4. Open sleeve and fold each edge in half again to the middle press line with wrong sides together. Firmly press these lines in as these two lines will be your hand sewing lines.
5. With wrong sides together, sew a 1/4" seam the length of the sleeve. To avoid having loose threads straying out the ends of your sleeve make sure you start and finish each seam away from the edge. I usually begin sewing 1/2" to 1" in from the edge and then sew to the edge.
6. Press the seam open taking care not to press over the previous pressed folds. The sleeve will be fuller on the side without the seam. This fullness is the extra room for the rod to fit comfortably.
7. Pin sleeve (sleeve seam should face the quilt backing) along pressed edges to the quilt back. The top of the sleeve should be about 1/2" from the top of the quilt. Hand sew all the sleeve edges, taking care not to stitch through to the quilt front. It is best to ensure you do sew through some of the batting as well as this creates a stronger sleeve.
Return From Christmas Wreath Quilt Back To Quilt Pictures
Back To Quilts Home Page
Sign up for my newsletter below!
Like the page? Let me know! (click the button).
Love Quilts?
Come be social with me - click here!


Sign up for my newsletter below!

How there's so much free information on this site.
Sometimes I recommend a product(s) that I have used & loved when making my quilts etc. If you buy something through one of these links, I receive a small commission which allows me to design & make more quilts! There is no extra charge to you, and it helps keep my information/patterns free of charge. To learn more please see my affiliate disclosure document.
Recent Articles
-
Perth Quilt Tour 2019
Nov 08, 18 04:17 PM
May 19 to May 28 2019 – Time for a getaway Join the fully escorted tour and take in the sights and tastes of the Margaret River Valley, visit the Perth Craft & Quilt Show and plenty of other exciting…
-
Pattern available for the Conical Felt Tree!
Oct 13, 18 11:21 PM
The Conical Felt Tree pattern is now available. This is a fabulous Christmas tree to make for young children. They will decorate this tree over and over again! Suppliers of the thick felt & Velcro fab…
-
Conical Felt Christmas Tree
Oct 11, 18 09:00 PM
Cassie is having fun decorating her Christmas tree! The pattern will be available at the end of October 2018.
New! Comments
Have your say about what you just read! Leave me a comment in the box below.