- Home
- Rag Quilts
- Chenille
Chenille Rag Quilt Pattern
So Soft and Snugly!
Learn how to make your own!
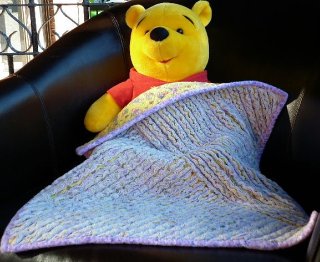
Are you wanting to make a chenille rag quilt?
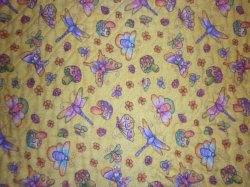
You need to choose 5 to 7 different flannel fabrics. The more you use the fuller the rag effect you will get at the end. If you want a softer look like mine then use fabrics that are surface died (their back is white) - a bolder look is created by using fabrics where the colour can be seen on both sides of the fabric. This is particularly important for the fabrics that go between the top & backing fabrics.
Quantity of fabric depends on the size you want to make. A lap quilt can be made from using 1 1/2yards of each fabric and completing the quilt as a single unit. Alternatively you can create a chenille rag quilt using squares and then sewing the squares together.
Remember that flannelette fabric comes 36"(90cm) wide so if you are wanting to make a large chenille quilt then you will need to think about how you want to achieve this.
The following pattern takes you through the basic steps of making chenille.
Step 1:
Cut backing fabric slightly larger than the other fabrics. This will make it easier to cut in step 6. Cut remaining fabrics to the same size.
Place the backing fabric right side down.
Step 2:
Position the remaining fabrics one on top of the other all right side up. Pin layers together Round corners using a dinner plate if you want a different look. This step also makes attaching the binding much easier as you don't need to deal with corners.
Step 3:
Use tailors chalk, hera pen or an erasable marker and draw a diagonal guideline from the upper-left corner to the lower-right corner.
Step 4:
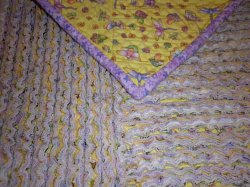
Sew your first line over the guideline you drew in step 3. Use this first line as a guide to sew the remaining lines, spacing them 3/8" or 1/2" apart. You can use either your presser foot as a guide or you can pre rule each line like the first. I sewed half of my lines perpendicular to the other. See photo.
Step 5:
Stitch around the outer edge of the quilt. This will make it easier to bind your quilt later.
Step 6:
Using a slash cutter and taking great care to place the extending finger above the two bottom layers of fabric, cut along the channels between the rows of stitching. This can be done with blunt ended scissors but it is much easier with a slash cutter. You will be cutting through the outer edge of stitching from step 5.
Step 7:
It is now time to bind your quilt. Measure around the outer edge of your quilt. Cut 2 1/2" wide strips of fabric on the straight of the grain and stitch together to form a continuous binding. Fold binding in half, wrong side to wrong side, lengthwise and attach to the front of your quilt. Fold over and slip stitch in place.
Step 8:
Now you are ready to wash and dry your quilt. This step is where all the magic happens! Use a small amount of detergent and a short wash cycle. When washed shake out the quilt and remove any loose threads. Place in the dryer remembering to use a hot setting on your dryer. Because the quilt has so many layers it will take a long time to dry. Once dry give it a good shake and if needed a quick trim.
Congratulations on completing your chenille rag quilt!!
Now you have mastered the basic technique of making a chenille rag quilt you can experiment with different ways of piecing chenille squares together. Try only cutting through half of the square and arrange the squares in different combinations.
My Amazon ads are my affiliate links. Thank you.
- Home
- Rag Quilts
- Chenille
Sign up for my newsletter below!
Like the page? Let me know! (click the button).
Love Quilts?
Come be social with me - click here!


Sign up for my newsletter below!

How there's so much free information on this site.
Sometimes I recommend a product(s) that I have used & loved when making my quilts etc. If you buy something through one of these links, I receive a small commission which allows me to design & make more quilts! There is no extra charge to you, and it helps keep my information/patterns free of charge. To learn more please see my affiliate disclosure document.
Recent Articles
-
Perth Quilt Tour 2019
Nov 08, 18 04:17 PM
May 19 to May 28 2019 – Time for a getaway Join the fully escorted tour and take in the sights and tastes of the Margaret River Valley, visit the Perth Craft & Quilt Show and plenty of other exciting…
-
Pattern available for the Conical Felt Tree!
Oct 13, 18 11:21 PM
The Conical Felt Tree pattern is now available. This is a fabulous Christmas tree to make for young children. They will decorate this tree over and over again! Suppliers of the thick felt & Velcro fab…
-
Conical Felt Christmas Tree
Oct 11, 18 09:00 PM
Cassie is having fun decorating her Christmas tree! The pattern will be available at the end of October 2018.
New! Comments
Have your say about what you just read! Leave me a comment in the box below.